Create a beautiful textured look with clay paint
Can you paint furniture with clay paint? Absolutely! Here’s how to create a beautiful textured look with clay paint.
I have an exciting post today as Dixie Belle has just launched a new range of clay-based paint. Not just new colours but a whole new range. To join their chalk paint and (my favourite), their Silk all-in-one paint lines.
I love a good sneak peek!
Half the fun of a new product is the trial and error of playing with it. Bonus point that I ended up with something that I love!
Thanks to Dixie Belle for sponsoring this post.
This post includes gifted products and affiliate links so you can easily find the products I use myself and recommend to friends. If you purchase these products, I may earn a small commission at no extra cost to you.
Create a beautiful textured look with clay paint
I haven’t used clay-based paint before. But I know that they are good for blending and creating layers. So, quite different to my normal clean style.
My canvas for this experiment was this side table. It was free from a charity shop. They gave it to me because they thought that no one would buy it. Perfect!
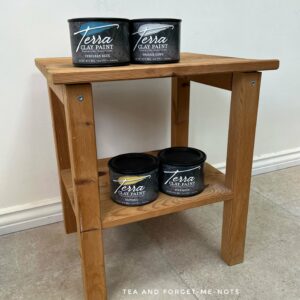
It was in reasonable condition. It had some watermarks on the top and a split in the leg but was otherwise fine.
To fix the split in the leg, I used superglue and a clamp. It was set within a few minutes. Some great advice I received is to make sure that you have your clamp before you glue anything. Very wise!
How to use clay paint video
New to upcycling? Here are the 5 products to get started!
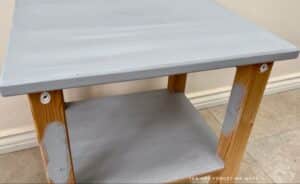
To prep the table, I cleaned it with White Lightning and rinsed it with clean water.
The Terra range comes with its own cleaner. But that was still in the mail at the time of doing this project. However, it will be launched with the rest of the products in July.
I then sanded the table with medium-grit sandpaper to rough up the surface for the paint to stick. And then finished with fine-grit sandpaper to get a nice smooth tabletop.
The metal screw holes were visible, so I added a touch of Slick Stick over them. Slick Stick is perfect for shiny and metallic surfaces to help the paint stick to them.
Then for the final prep step, I did a coat of BOSS primer on the tabletop and over the knots in the wood. I didn’t know how well Terra paint would cover those knots or if it would bleed through the paint.
Primer was essential to protect the knots from bleeding in this makeover!
How to use clay paint
Now onto the fun bit of playing with this new paint!
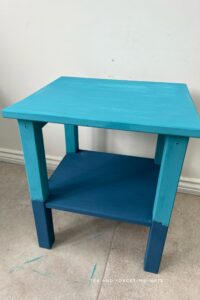
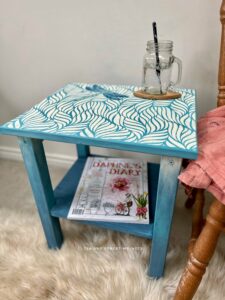
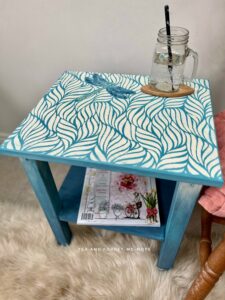
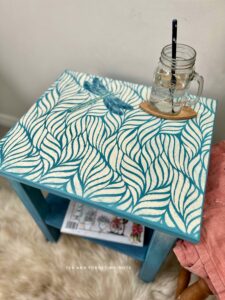
The main feature of these paints is that they’re good for blending and layering. So, I wanted my table to transition between my two blues, Blue Moon and Cerulean Blue. I imagined a lovely beachy, nature-inspired look.
Want to know 23 great DIY tools? Get the list!
It’s best to lightly dampen the brush because the paint is thick and it helps to keep it moving.
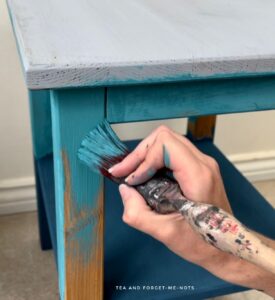
I did a solid base coat of each colour to start with. I didn’t want the natural wood or the grey primer underneath to be visible after blending to create the layers.
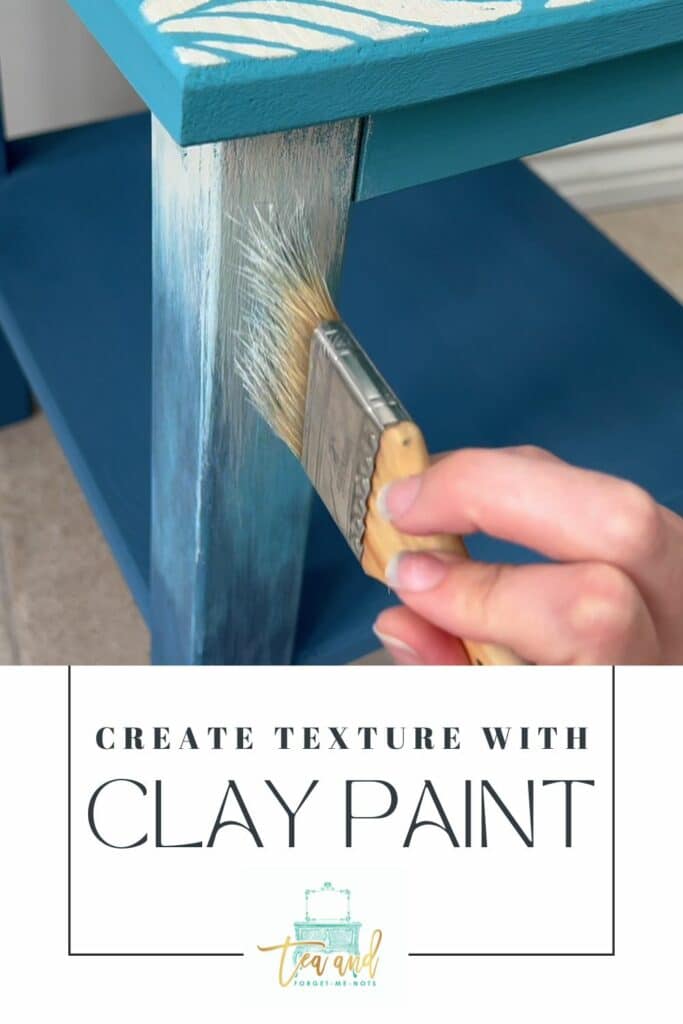
Clay-based paint is not self-levelling. This means that it’s great for adding texture as the brush strokes stay visible. Perfect for an artistic, textured look with lots of depth.
If you’re a fan of the clean and classic look, here’s a blog favourite!
Adding a stencil
I wanted some decoration on the top. I chose a stencil called Enchanted Garden. It comes in two parts. One section has a repeating pattern and the other has a dragonfly detail.
I used stencil spray to attach the stencil temporarily to the tabletop. For the paint, I chose Prairie Dawn which is a creamy white in the Terra line.
I needed to move the stencil six times to cover the entire tabletop. Because the stencil was so detailed, it took at least an hour to do it all.
Stencilling doesn’t have to take a long time though. These mini-makeovers took minutes and completely transformed them!
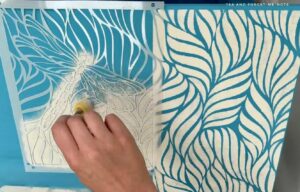
The tabletop wasn’t wholly smooth which worked nicely with the grungy look that I was going for.
I wanted to do something to make the dragonfly stand out more. So, I used Blue Moon like a watercolour paint. I applied the paint to the edges of the wings and blended it out with water to create a gradient.
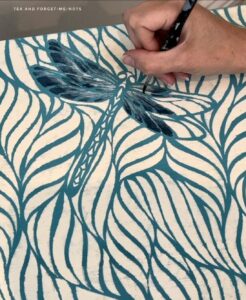
Finally, I used my fourth colour, Daffodil, for the dragonfly’s body.
I added Prairie Dawn to the legs to create a bolder transition between the blues.
It was a process of using a mister bottle, chip brush, sponge and cloth to move the paint around to get a look that I liked.
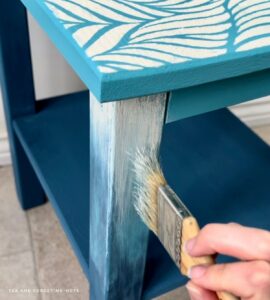
After I’d added the white to the legs, I felt that the single colour on the shelf was a bit boring. So I added Cerulean Blue over the top. It settled nicely into the grain and created some more depth.
How to seal clay paint
The most important thing about clay paint is that it is reactivated by water. This means that it will always come off unless it is sealed.
So, you always have to seal it. And seal it with something that is not water-based, such as wax.
This range comes with a heavy-duty wax called Terra wax. However, this was also in the mail when making this.
So, to protect the table, I used Easy Peasy Wax. Which is a light wax that you spray on and wipe with a cloth.
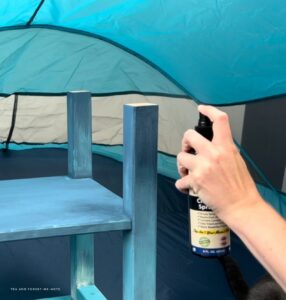
I used this to give it basic protection. And when the Terra wax arrives, I’ll use that for a more durable finish.
It was a lot of fun playing with these paints. I don’t often blend paint but I can see myself doing it more.
I love the colour combinations that I was sent, they work nicely together.
And has made a statement of this otherwise destined-for-landfill table.
These paints are brand-new and will be available in July. I’ll link to them when they are available but you can go to the Dixie Belle website to learn more about them.
Like to see the paint in action? Watch the short YouTube video!
I hope you enjoyed this transformation. If you did, you might also like these brightly coloured side tables.
Pin it for later – textured look with clay paint

Hi there! I'm Rachel Bowyer, a passionate DIY enthusiast with a knack for transforming the old into something beautifully new. With a deep love for furniture painting, refinishing, and the art of crafting. I've been documenting my DIY projects and restoration journey since 2018. I specialise in techniques like decoupage, stencilling, and decor transfers. Join me as we explore the world of creativity and home improvement, one project at a time.
Clay based paint?? What a cool way to bring texture to furniture or other project.
I know, it was new to me too, and a lot of fun to play with.
This table turned out really cute, Rachel.
Thanks, Tammy!
Great transformation! I like how you blended the paint on the legs! I’ve never heard of clay-based paint, so I’m interested to learn more about it! Thanks, Donna
Thanks Donna. I’m going to do more so it will be interesting to learn more about it.