How to paint mismatched furniture to look cohesive
Want to paint mismatched furniture to make it look like a set? Here are the key elements to create a balanced and cohesive look.
Not as many people have a classic set of bedroom furniture these days. Pieces are acquired over time, bought separately or received as hand-me-downs. Which means that they don’t always look right together.
To reduce the visual awkwardness of having different shapes and colours, you need something that ties them all together. They don’t have to match, in fact, they probably won’t, but they can have a theme to make them look harmonious and balanced.
This post includes gifted products and affiliate links so you can easily find the products I use myself and recommend to friends. If you purchase these products, I may earn a small commission at no extra cost to you.
How to paint mismatched furniture look cohesive
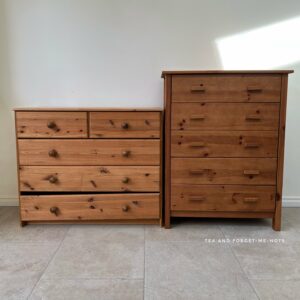
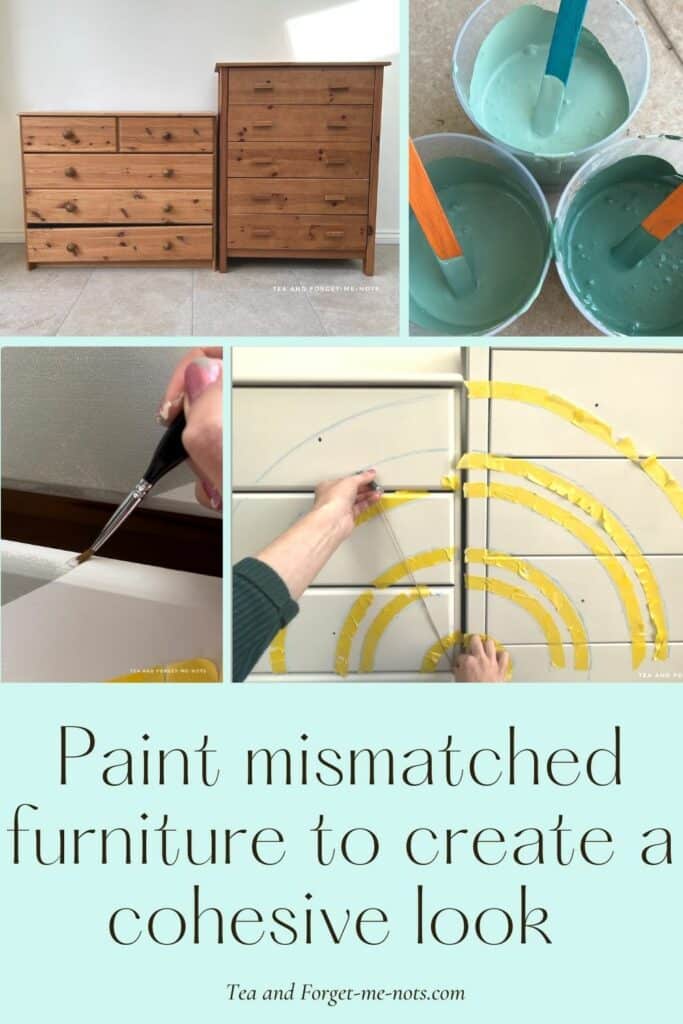
These two sets of drawers came to me as a commission. They have been in the family for around 20 years. This is exactly what upcycling is about. Giving a second (or third!) lease of life to something that functions well but is no longer right.
The key to making a set out of mismatched furniture is in the colour and handles. That creates a cohesive look without needing to be a perfect match.
Paint Mismatched Furniture Video
Preparing the pieces for paint
The drawers were in decent condition. The solid wood piece on the left had some split runners which meant that the drawers didn’t sit straight. And there were the usual dents from a bit of age. Otherwise, it was a good basis to start from.
I did an initial clean with White Lightning to get any dust off. They were nice and clean to start with which made it easier. I then did a second wash with plain water to remove any leftover cleaner.
You just have to look at the water after this transformation to see why you need to clean.
I treated the drawers differently when it came to sanding, due to one having a veneer. There’s a risk of making a hole in the veneer by sanding too vigorously.
So, I sanded the solid wood piece with my orbital sander and used medium grit sandpaper on the veneer. This was to rough up the surface and take off some of the shine, to help the paint stick to it.
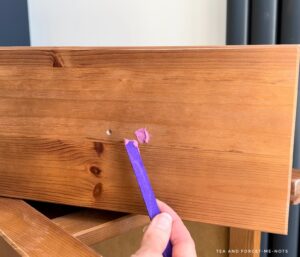
The customer chose single knob handles, so there were 10 holes to fill in. It’s best to use wood filler when the drawers are vertical. Otherwise, the filler works against gravity and it is harder for it to stay in place while it’s setting.
For this, I used Plastic Wood-x. Admittedly I bought this because it was pink and fun. It dries a natural wood colour though, so doesn’t cause issues with showing through the paint later on.
I also put some primer over the knots in the wood. As this was light wood, it’s less likely that the knots would bleed through the paint like a stain. However, I primed it so that they were more hidden. Which gives the paint a more consistent look across the piece.
Choosing the right paint
My customer initially wanted to buy this grey chest of drawers that I painted but it wasn’t the right size for their space.
So then they asked me to upcycle their existing furniture using the same colour. But unfortunately, that piece was painted with a discontinued colour and I didn’t have enough for two more pieces.
Then the customer debated whether they wanted grey or white. So I had the perfect solution with Oyster. It sometimes appears greyish and other times white. And was ideal as a neutral base.
I painted two full coats of Oyster, with a few touch-ups in some places. I used a synthetic round brush for the edges and ridges in the wood and a roller for the larger flat surfaces.

How to make mismatched wood furniture look cohesive
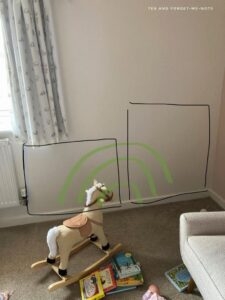
I asked permission to share this photo as I love it!
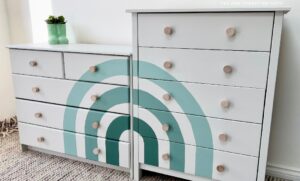
This is the design mock-up from the customer. It just perfectly captures their idea. It tells me which way round the two pieces are going. And they’d like a green rainbow going across the two units. Simple. Perfect.
Creating the rainbow shape
The best way to see how I created the shape of the rainbow is to watch the YouTube video.
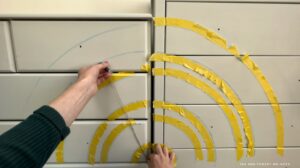
I wrapped string around a lollipop stick and wedged it under the drawers so that it wouldn’t move. This meant that it didn’t damage the drawers like using a nail would have done.
I attached chalk to the end of the string. Chalk was a good choice because the lines were easily removable with a wet wipe.
Then keeping the string tight, I used my other hand as a pivot point to create the arch shape. For the inner arches, I used a tape measure to make sure that the arches and the distance between them were even.
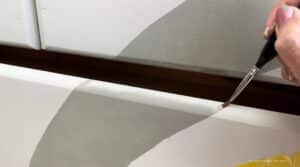
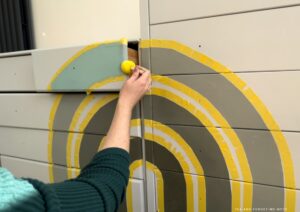
Once I had the chalk outline, I masked out the lines with FrogTape. It was never going to make a perfect arch because of course the edges of the tape are straight. So I used small strips of tape but knew that I would be perfecting the shape by hand after it was initially painted.
Painting the rainbow
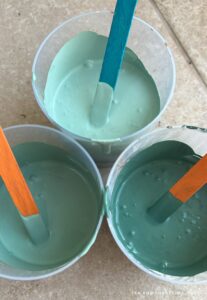
The customer chose the green, Cactus for the smallest arch at the bottom. Cactus has grey undertones, so is complementary to Oyster.
They then wanted lighter variations of Cactus for the arches above. For these, I mixed the green with Salt Water.
I used a sponge dabber to fill in the arches and removed the FrogTape while it was still wet. If you wait for the paint to dry, it’s more likely to tear when you remove the tape.
I then used a fine brush to fill in the rainbow up and over the top of the drawers. It’s a little detail but when you open the drawer, it feels more complete.
So, the rainbow arches were complete. Not perfectly shaped but the colour was on.
I asked the customer what they thought because, to me, the colours weren’t what they had pictured in their mock-up. We’d used Cactus as requested but it was more muted than I thought they were going for.
Sometimes you have to try it out before you really know if it’s what you want.
And the customer agreed that it wasn’t right for them. Fortunately, I love green so had quite a selection of alternatives.
Want to know 23 great DIY tools? Get the list!
Paint mismatched furniture
On to attempt two.
The base colour we changed to was this rich forest green, Palmetto. This would brighten the rainbow a lot and make it stand out more.
For the larger arches, I mixed Palmetto with Tide Pool and created this lovely combination.
I used Tide Pool in my recent chest of drawers makeover and the colour just by itself is beautiful. Perfect for spring.
You can see how much of a difference the brighter colours make. It’s almost like going from a black and white TV to a colour one!
A much better match for the mock-up.
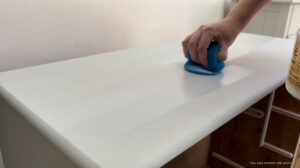
Oyster is Silk paint and therefore does have a top coat in it. Even so, I always like to do more than one coat of sealer. I did an additional two coats of Clear Coat in Satin to give the piece both protection and a slight sheen.
The blue sponge is one of my newest discoveries and it’s amazing. It is specifically for applying top coats and is so easy to use. It doesn’t leave brush strokes (I mean, of course, because it isn’t a brush!) and has a really smooth finish.
Then I attached the new wooden handles which complement the colours beautifully. And we were done.
Can you make mismatched bedroom furniture look good?
So, does furniture need to match? I don’t think so. With this paint, the handles and the pattern, they’re not identical but they are cohesive. They work together and that’s the key to a harmonious look.

It was the right choice to change the colours. If you know something isn’t working, the best time to fix it is then. Otherwise, you’ll just keep thinking about it until you do change it.
The customer is delighted with them. It has given a second lease of life to drawers that were past their best. Perfectly functional but uninspiring. And now they’re just charming.
If you’d like to see the full transformation, please check out the YouTube video.
Or if you have questions about the exact process of creating the rainbow, ask them below.
Would you paint mismatched furniture to make it look like a set? Or have you? I’d love to know.
If you liked this makeover, you might also enjoy these colourful children’s tables…
More about upcycling and refinishing furniture.
Pin it for later – paint mismatched furniture to create a cohesive look
Paint mismatched furniture

Hi there! I'm Rachel Bowyer, a passionate DIY enthusiast with a knack for transforming the old into something beautifully new. With a deep love for furniture painting, refinishing, and the art of crafting. I've been documenting my DIY projects and restoration journey since 2018. I specialise in techniques like decoupage, stencilling, and decor transfers. Join me as we explore the world of creativity and home improvement, one project at a time.
Very cool; I’ve never taped anything circular.
It’s certainly doable but requires time for touch-ups.
Aw the rainbow is the sweetest. It totally unifies these pieces.
Thank you!
This is ADORABLE!!! I love how the two pieces together create one rainbow. Thank you for sharing this idea with us. Oh – and I love the color green you chose. Pinned.
Thanks so much, Anna! The greens were a definite work in progress but so happy with the end result.
Great job! Love the colors too.
Thanks, I appreciate that.
Gorgeous project, Rachel! I love the colours you used!
Thanks, Marieza.
great makeover! lots of helpful tips! thanks for sharing!
Thanks, Kimberly