How to redecorate plain decor with a new lease of life
You don’t need to buy new decor! You can redecorate plain decor and give it a fresh new look with paint and a little creativity.
I have three decor projects to share today. Three ways to give a little bit more personality to some good quality pieces.
It’s not always worth upcycling something. Some things are given away or sold cheaply for a reason. But there are some great little upgrades that you can do to decor that has good bones to start with.
This post includes gifted products and affiliate links so you can easily find the products I use myself and recommend to friends. If you purchase these products, I may earn a small commission at no extra cost to you.
How to redecorate plain decor with a new lease of life
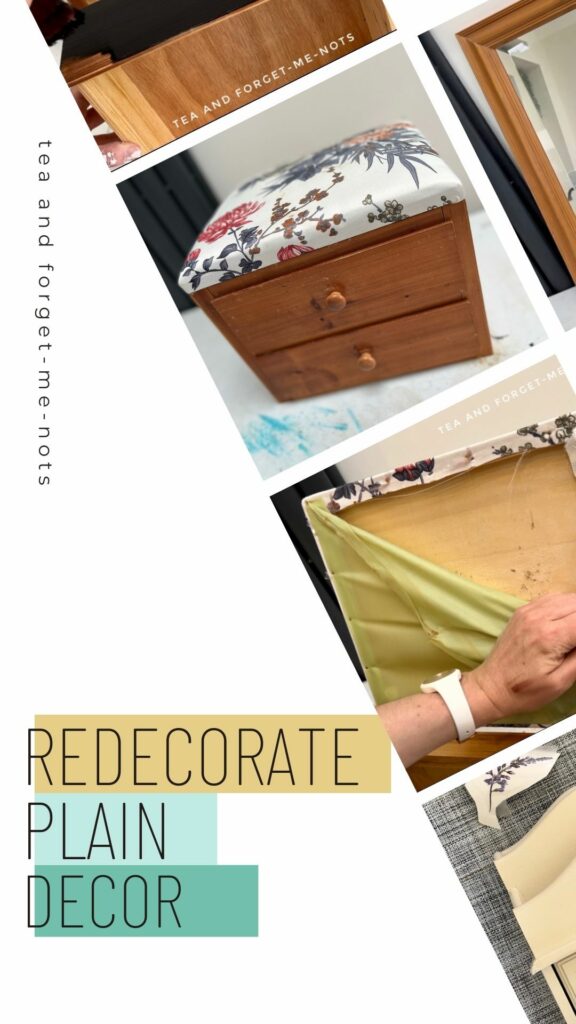
The first piece is this upholstered box which cost £5 in a charity shop. It feels like it might be a sewing box to me.
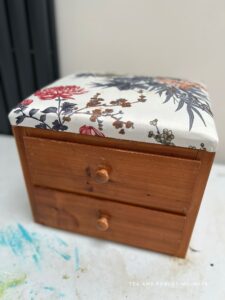
It has two drawers and a lift-up lid. I’m not sure why the lid lifts up when it only gives you access to the top drawer. But it is a pretty little set.
It was in reasonable condition although needed a little work to tidy it up. The fabric on the cushioned top was stained and needed replacing.
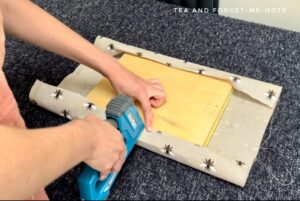
Change a look with new fabric
The original fabric was nailed on, so it was easy to remove. I kept the cushion as it looked in fine condition.
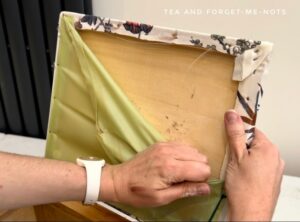
I chose a paint that nicely matched the fabric. Long-time readers will recognise this fabric. I’m nearly out of my stash of it. I bought 2 meters of it at a handmade fair a few years ago.
And there was enough to recover the cushion with it.
For a more in-depth look at reupholstering a cushion. Here’s a beautiful floral fabric makeover.
Then I cut the new fabric to size and stapled it into place. I folded the corners carefully so it overlapped itself and left a neat edge.
The drawers were a little dinged up. Nothing serious but I wouldn’t be able to sand them smooth as the veneer was very thin. I also couldn’t have filled the dings and left the wood natural, or stain it, as the wood filler would be obvious.
So, the only option for the drawers was to paint them.
Someone asked me recently if I paint everything I work on. Of course not! It depends on both the needs of the piece and of the customer. I’m just less likely to write about those pieces because they don’t always look very different after a refresh.
For the drawers, I used two coats of the black paint, Anchor. Which I thought worked nicely with the blac of the bumblebees.
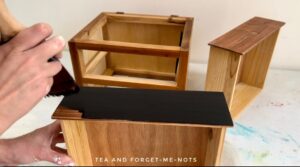
I intended to leave the knobs the original wood colour. But after the drawers were painted, I felt that the knobs looked unfinished. So I mixed a combination of Dried Sage and Endless Shore to get a similar greige to the fabric.
Finally, I sealed both the drawers and the knobs with two coats of Clear Coat in Satin.
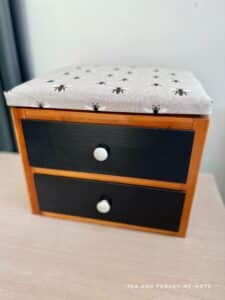
It’s such a sweet set of drawers. I liked it before but it did need a bit of cleaning up. Leaving some of the wood natural balances the black nicely. It’s still pretty but now in a different way.
Want to know 23 great DIY tools? Get the list!
Redecorate plain decor with a furniture transfer
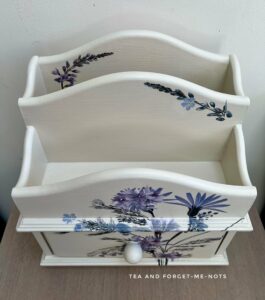
Project two was this letter rack. It cost £2, also from a charity shop.
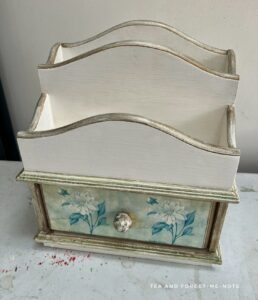
It was in good condition. The only issue was that the gold around the edges had tarnished and turned green.
Firstly, I sprayed it with White Lightning and then rinsed it with clean water.
The rack had floral decoupage on the drawer front. I removed it by saturating the paper in water for a few minutes and then scraping it off.
I liked the original creamy colour but it did need freshening up. So, I found a similar colour in my stash which was Endless Shore.
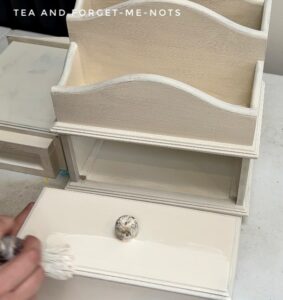
The trickiest part was painting the letter holder area. Firstly, because of the narrow-angle to get a brush to the bottom of the inner sides. But also on the second coat, there was a risk of scratching the fresh paint with the handle of the brush.
The piece looked much cleaner with a few coats of Endless Shore. I initially thought I would add some gold accents back to the edges but liked it as it was.
Depending on the brand on furniture transfer you use, sometimes you seal the paint before applying the transfer and for others, it’s after.
For the letter rack I chose the Oiseau Blue transfer from Hokus Pokus. I used one of the larger bird pieces on this cabinet makeover. It divided opinion but it most importantly, the customer adores it.
And with Hokus Pokus, you seal the piece before applying the transfer. So, I sealed it with two coats of Clear Coat in Satin.
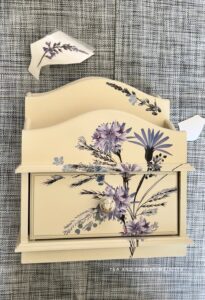
As the rack has ridges, it’s not straightforward to apply a transfer over those sections. Even with applying it little by little and tucking it into each groove, it’s difficult to get a perfect finish. So I went back with some paint to blend it all together a little more.
I love transfers where there are lots of pieces. You can make a small decor item more special with just a few elements.
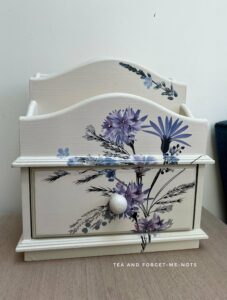
I’m really happy with this result. It has a similar look to the original, with calming colours and a pretty floral. But it’s now fresher and brighter.
Like mirrors and transfers? Here’s my most popular one ever!
A new lease of life for a plain mirror
Then for my final makeover, I recreated a mirror that sold in one day. This is a different style mirror but I used the same paint colour and transfer.
Check out that full makeover here. It was a collaboration for Sara from Birdz of a Feather so you can see their knockout mirror transformation too.
I’ve had this pine mirror in my stash for a while. It cost £3.50 from a charity shop. Fortunately, it was in great condition.

No, not everything I buy is from a charity shop! Here’s how I find all my freebies!
I started by sanding the surface to take the shine off and make it easier for the paint to adhere. 180 grit sandpaper works quickly but isn’t so abrasive that it takes chunks out of the surface.
I then cleaned the dust and dirt off by using White Lightning.
Because this mirror has knots in the wood, I could have primed it to ensure that they wouldn’t show through at a later date. But because I knew I was going to use a transfer, I decided to place those transfer pieces over the knots instead.
I actually needed four coats of Buttercream this time. It’s unusual for me to need so many coats of the Silk range. I probably applied them quite thinly.
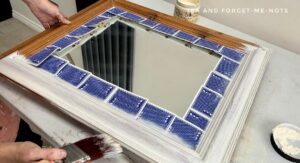
I also put playing cards under the inner edge of the mirror to protect the surface from paint.
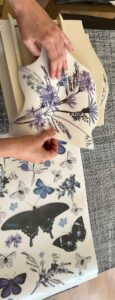
As I didn’t have a large surface area, I used some of the smaller pieces of the Bud and Branches transfer. I really like the mix of the pinks, purples and creams in this one.
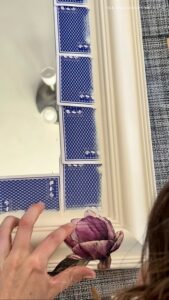
I also enjoy the various insects that were part of the transfer which I haven’t used before. The butterfly and dragonfly add a nice variation to the flowers.
Finally, to finish off, I did two coats of Clear Coat in Satin as the sealer.
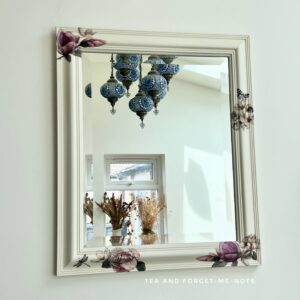
It’s changed a little from the original inspiration mirror, as it’s a different shape mirror. But the overall effect is the same and I think it’s a lovely combination.
So, three projects, a few different colours and all with a similar aesthetic. I do love clean colours and nature-inspired looks and these really summarise that.
Like more inspiration on how to redecorate plain decor? How about what you can do with a children’s globe!
Pin it for later – how to redecorate plain decor

Hi there! I'm Rachel Bowyer, a passionate DIY enthusiast with a knack for transforming the old into something beautifully new. With a deep love for furniture painting, refinishing, and the art of crafting. I've been documenting my DIY projects and restoration journey since 2018. I specialise in techniques like decoupage, stencilling, and decor transfers. Join me as we explore the world of creativity and home improvement, one project at a time.
This is all really helpful Rachel! I love your blogs & look forward to them 🙂 x
Aw, thank you, that’s very kind.
I love making something I already have look new and refreshed. It’s a miracle what a little paint and fabric can do.
Absolutely, it’s such a good use for things you don’t love.
Hi Rachel- Great information and the transformations are inspiring! Thank you for sharing.
Thanks very much, Anna
Great job on all three. My favorite is the piece with the gilding. I think that’s the French lover in me.
Pinned!
Thank you. I do love gilding, it just adds that little bit extra.
Enjoyed all three of your transformations! It’s amazing how different you can make an object look with a little bit of love! I have never used a transfer on furniture! It’s on my to-do list!! Thanks, Donna
Thanks, Donna. Please share if you do a transfer, I’d love to see it.