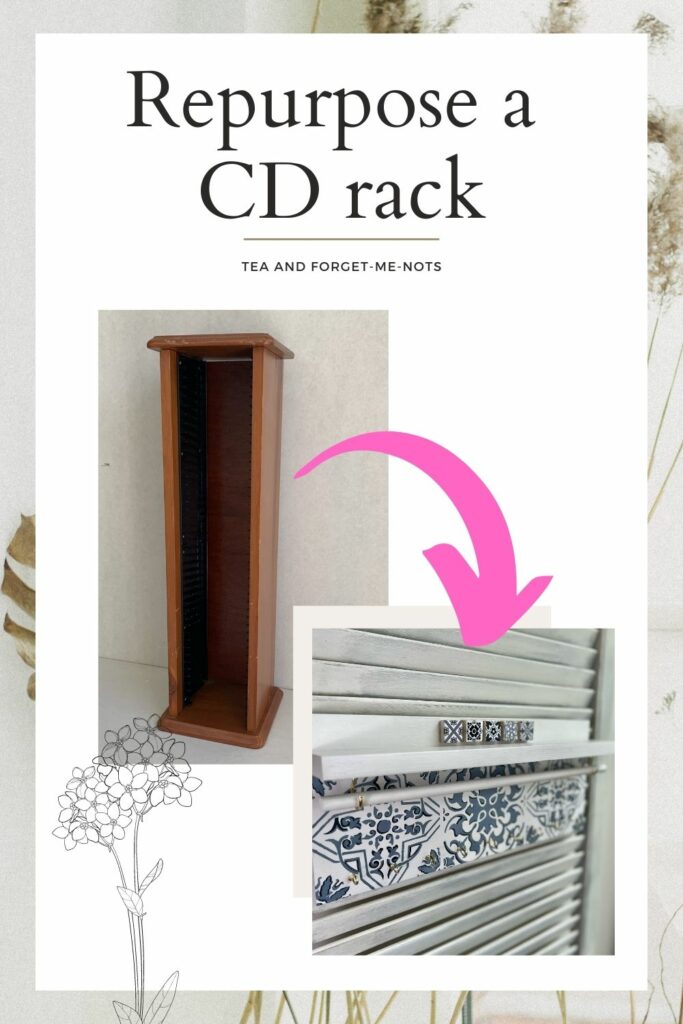
How to repurpose a CD rack into something beautiful
Have a CD rack that you don’t use? Repurpose a CD rack and make something beautiful! Here’s how to transform one into a jewellery holder.
How often do you have something you don’t use anymore and think the only solution is to sell it or give it away? But what if you could keep it and turn it into something you can love again.
Repurposing is one of the most creative parts of upcycling. You can turn broken teapots into flower pots or broken vases into mosaic art… The only limit is your imagination (or ability to search Pinterest)!
This is a makeover of two halves. With a small accident in the middle. That accident changed its future.
I started this project in September last year, so it has been nine months in the making. And it was worth the wait.
This post includes gifted products and affiliate links so you can easily find the products I use myself and recommend to friends. If you purchase these products, I may earn a small commission at no extra cost to you.
Repurpose a CD Rack Video
I got this CD rack for free from Facebook Marketplace.
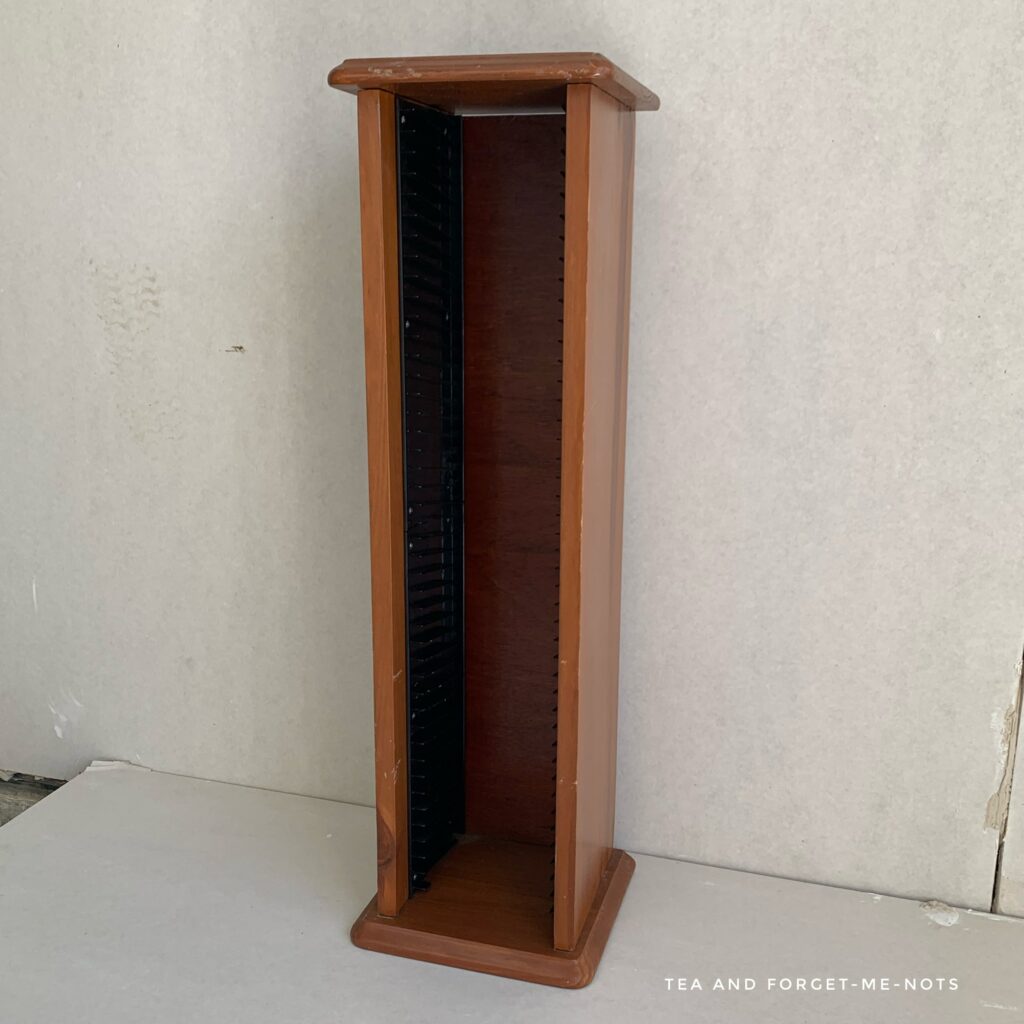
The seller was ready to take it to the dump. But it was in fine condition and solid wood, so a shame to waste it.
My original plan was to turn it into a garden planter.
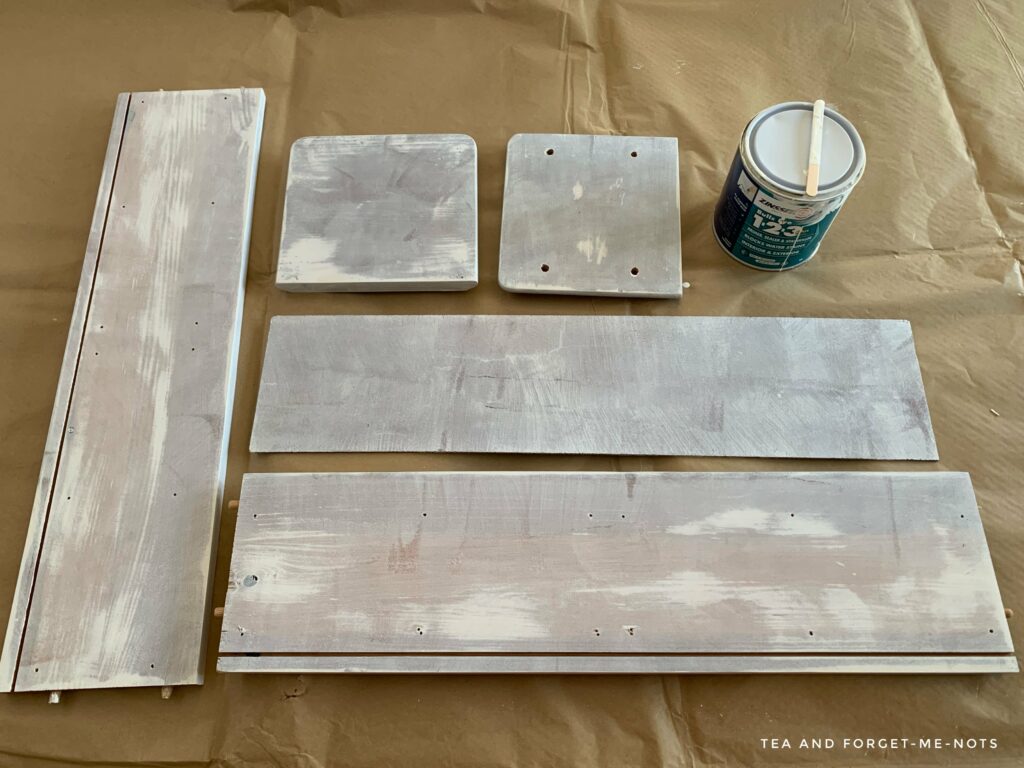
There were a lot of holes in the wood from where the racks had been attached. Firstly, I filled the holes in with wood filler and sanded them smooth.
Prepping the CD rack for paint
Secondly, I primed the wood with Zinsser 123 and painted it with Fusion Mineral Paint’s, Sterling. Which is a light grey.
And then, the accident.
I dropped one of the pieces of wood and it split in half. It couldn’t be repaired.
Just like one of my other silly mistakes!
So, it went back on the to-do list while I thought about how I could use the other pieces of wood. However this was for 8 months.
I could have avoided mentioning this false start.
But firstly, it’s an accurate depiction of the products I used to get the result. More importantly, it’s a reminder that it’s ok to have setbacks.
And this is where it comes to the Do It Over blog hop.
Do It Over’ Designers is a group of talented bloggers who love to recycle, upcycle and DIY. It’s about taking something old or unused and ‘doing it over’ into something new.
Check out all the ‘Do It Over Designers’ at the bottom to see their lovely do-overs too!
You might recognise one of those designers from our mirror collaboration!

So, I now had the perfect piece to do over.
What can you do with an old CD rack?
Originally I hadn’t finished the coats of grey paint, so I evened it out with one coat of BOSS primer.
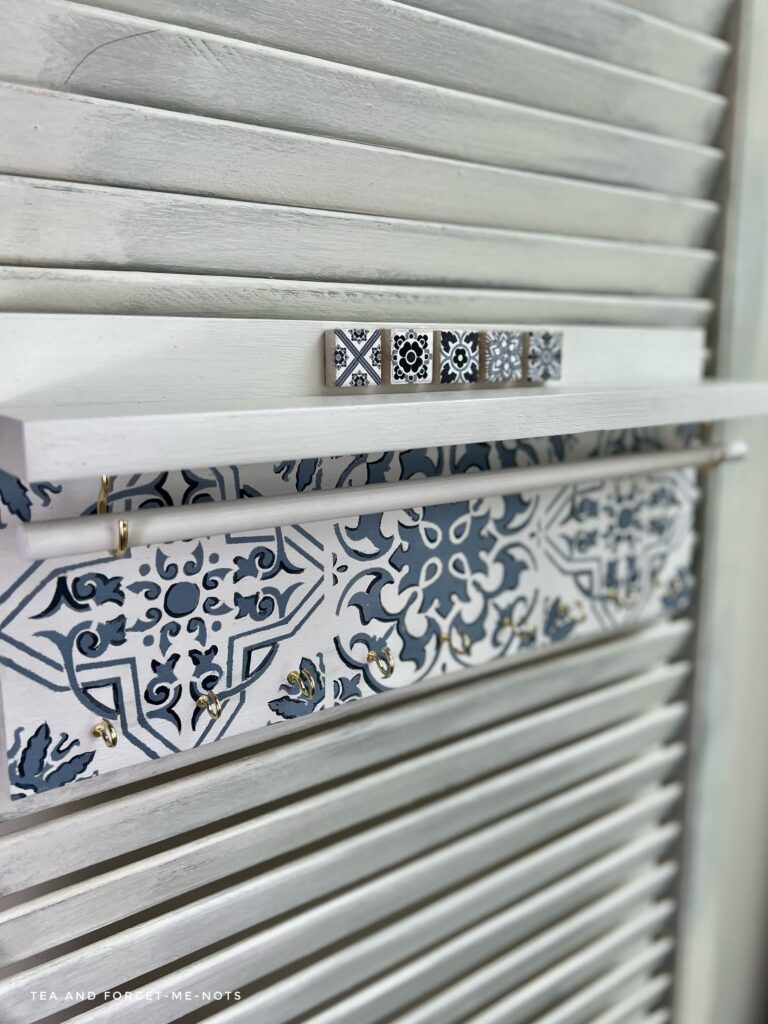
The inspiration for the design of this piece started from these mosaic tiles.
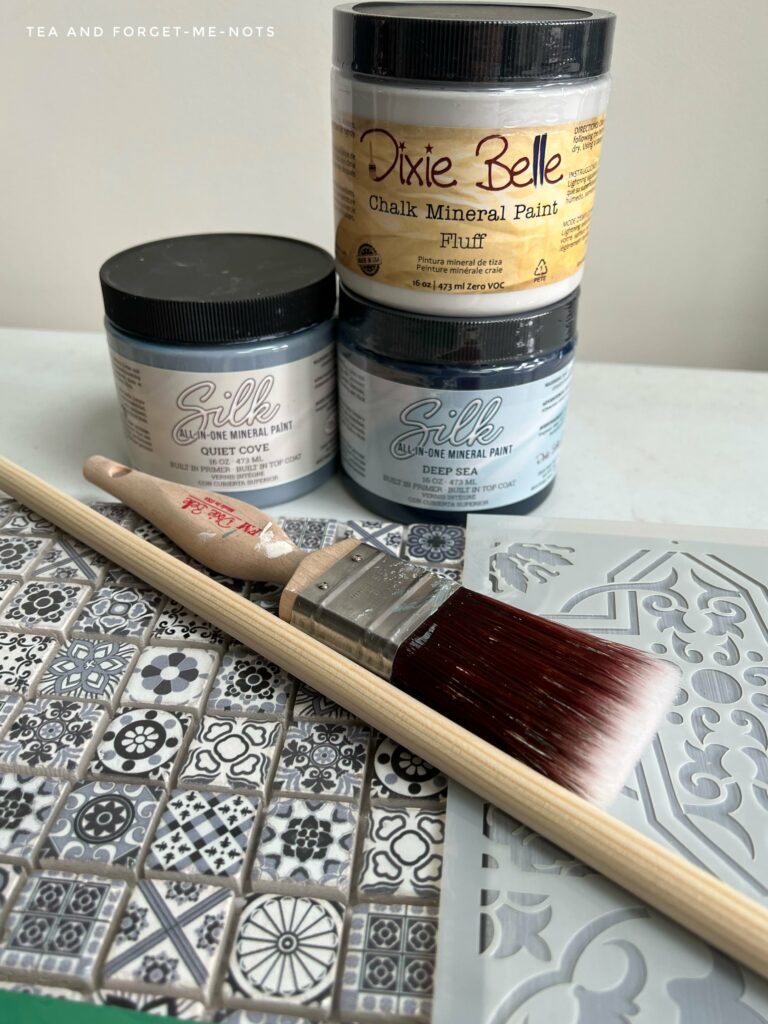
I also had a lovely stencil which was a tiled design. So the pair would work perfectly together.
Using the stencil size as my guide, I cut the wood down to size. I made the main part the width of the stencil.
I also knew that I wanted to add a shelf. Therefore with the second piece of wood, I cut it to how deep I wanted the shelf to be.
To secure the shelf in place, I drilled three holes in both pieces of wood. I lined up the holes using a set square and screwed them in place from the back.
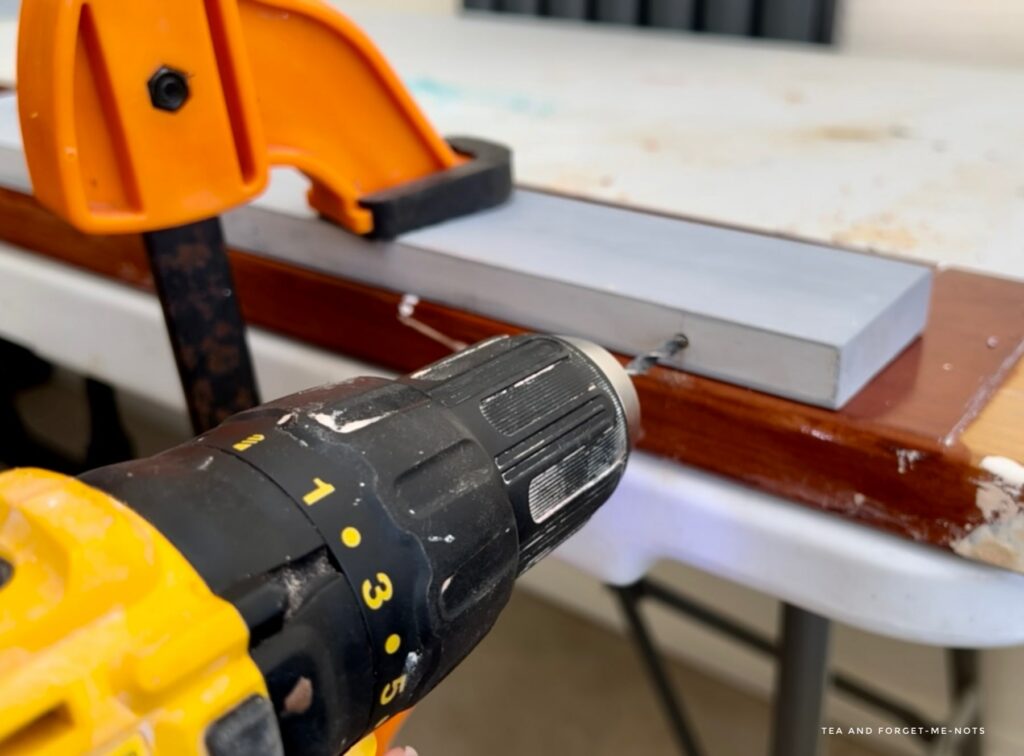
For the final assembly, I also used Gorilla glue, for added durability.
I assembled the piece at this stage, even though I took it apart again to paint. This was because I didn’t want to check the fit at the end in case I scratched the fresh paint with the tools.
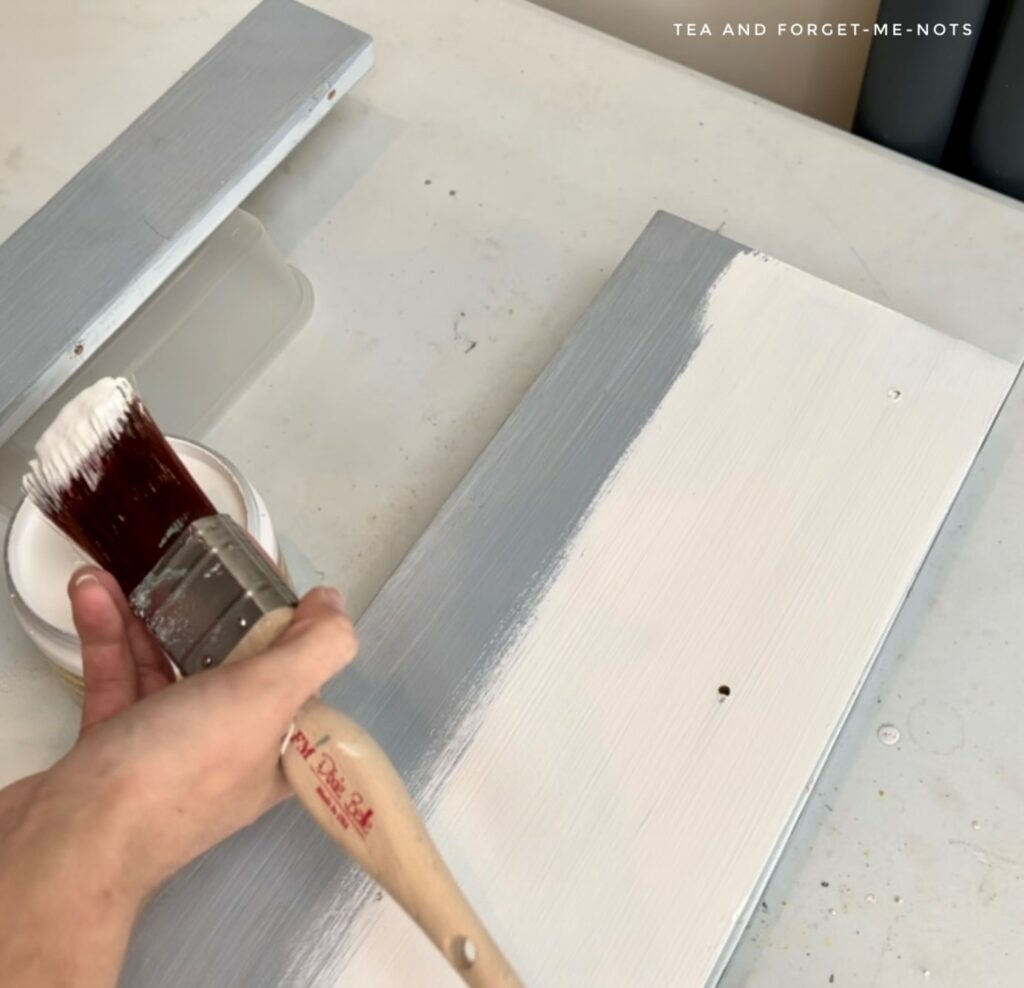
How to paint old CD racks
I chose the colour scheme to match the tiles using three of Dixie Belle’s paints.
For the main colour, I used the Dixie Belle classic colour, Fluff. Which is a bright white in the chalk mineral paint range. I painted three coats using a flat synthetic brush.
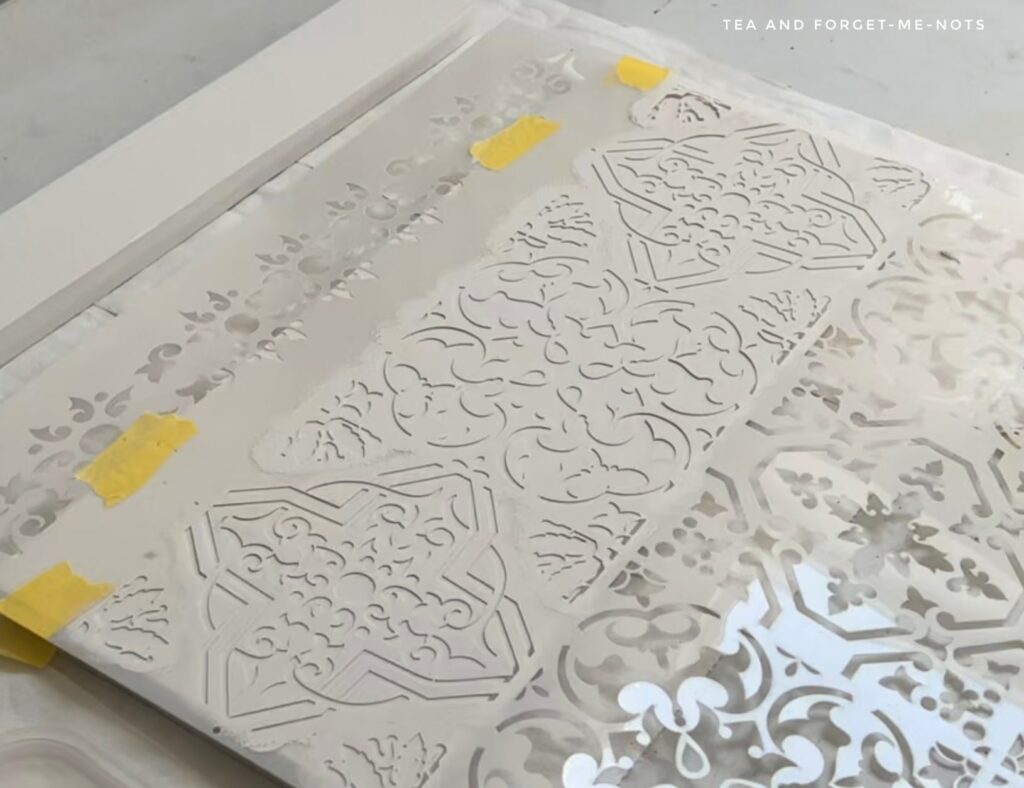
Another reason for disassembling the shelf before painting was because the stencil wouldn’t lie flat with the shelf in place.
To secure the stencil, I used FrogTape on the edges and stencil spray on the main pattern. FrogTape stops the entire stencil from moving. The spray keeps the fiddly bits of the design stuck to the project while painting in the details.
Here are all of my best stencilling tips!
I started by doing a base coat of the stencil in white, the same colour as the piece. This creates a barrier for the final stencil colour to stick to and avoid bleeding out of the lines.
If you are painting natural wood, you can do a coat of clear sealer for the same purpose.
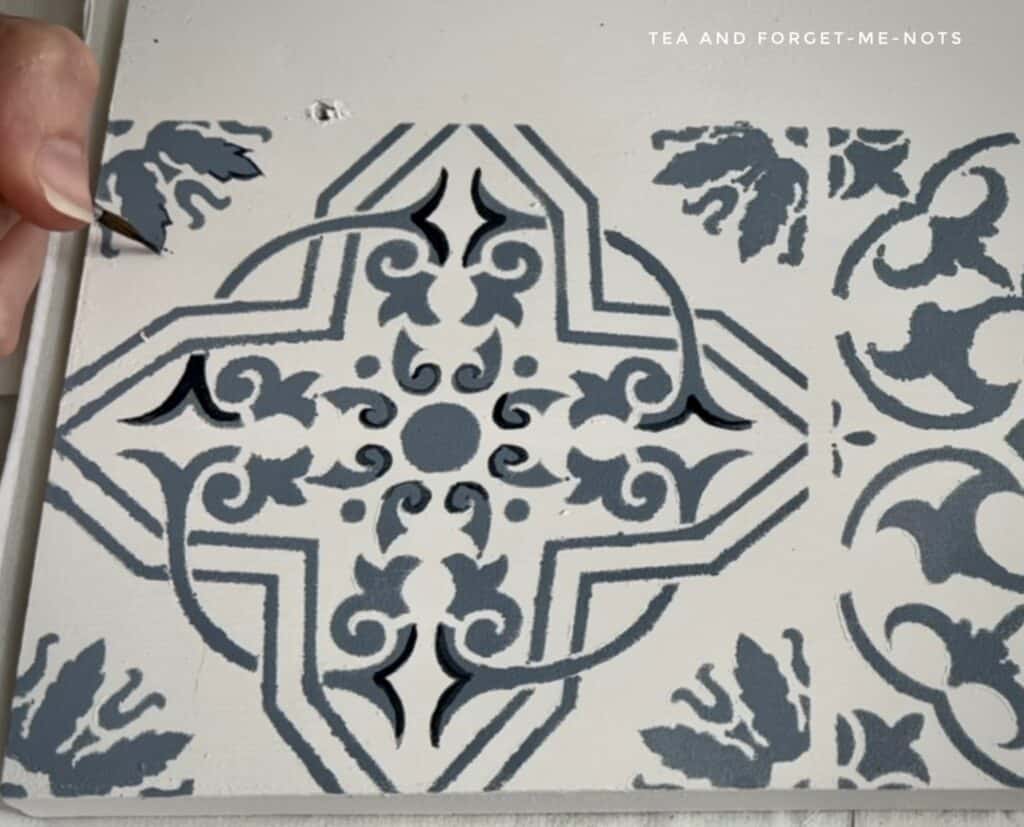
The trick to stencilling well is to use a tiny amount of paint. So little that it can feel like you’re making hardly any progress. But if you get impatient and use a lot of paint, you often end up having to do more touchups.

It’s also important not to put pressure on the sponge and lightly dab it on. If you push it, the paint gets under the stencil.
Like the blue and white style? Here’s a beautiful clock transformed with decoupage.
I painted the main part of the stencil in the lovely blue, Quiet Cove.
Then to mimic the style of the mosaic tiles, I chose a dark blue called Deep Sea. I used this as an accent colour across various parts of the design, to add more depth.
I sealed the piece with two coats of Clear Coat in Satin. Satin gives good protection. But even better, a nice, subtle shine.
Then for the final decorative touch, I added the mosaic tiles. The inspiration for this design.
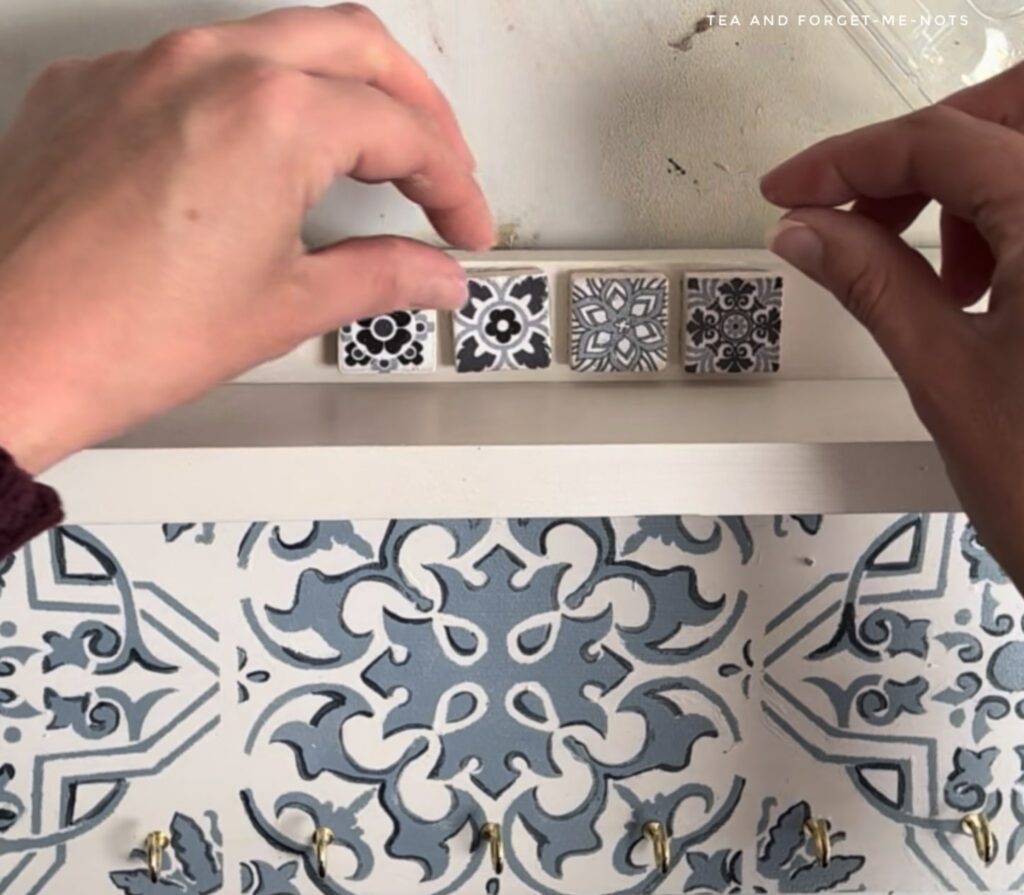
I chose a selection of 5 different patterns and attached them with Gorilla glue.
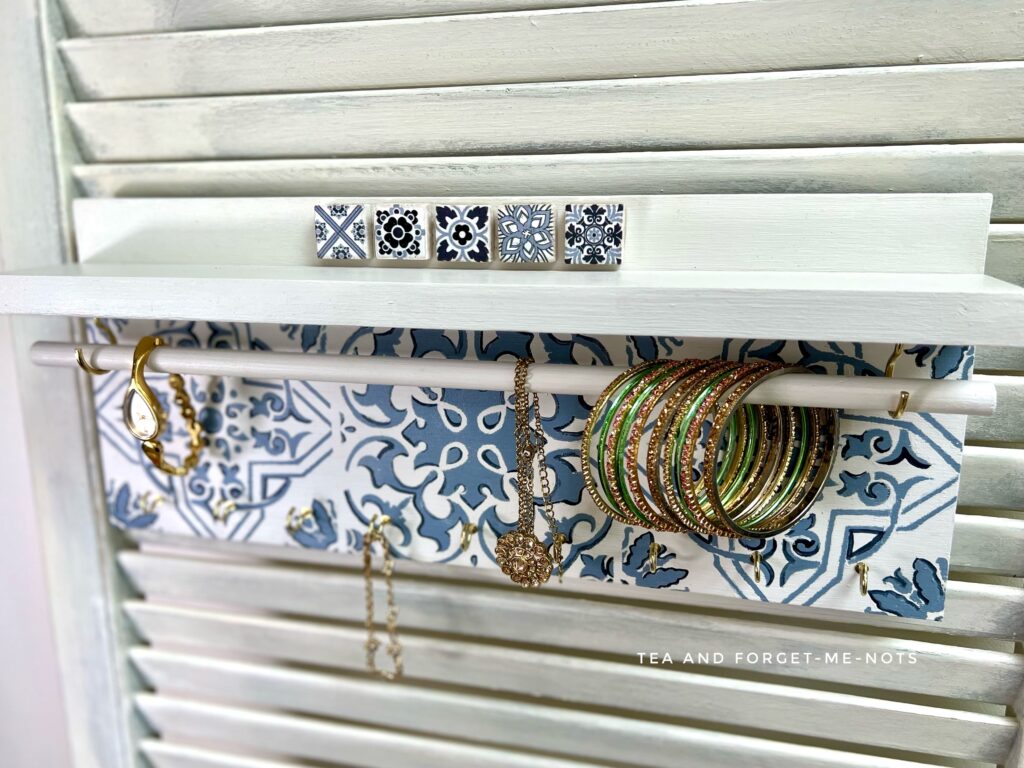
So, decoration complete. Finally time to make this a functioning jewellery rack.
I had also painted a wooden dowel and attached this to the shelf with gold screw hooks. This is designed to hold bracelets or watches.
I then used FrogTape to measure out 9 equal spaces for smaller hooks. I marked the tape, drilled placeholder holes and then removed the tape to screw the hooks in.
Did you know that you can attach screw hooks with a drill? Place a hook in the drill and link it to the one you’re screwing in. It does the turning for you. Very fun and helpful!
Like quirky ways of doing things? How about using balloons?!
Repurposed CD tower for jewellery storage
Considering this jewellery rack started its life as a CD rack, I think this is a really pretty transformation.
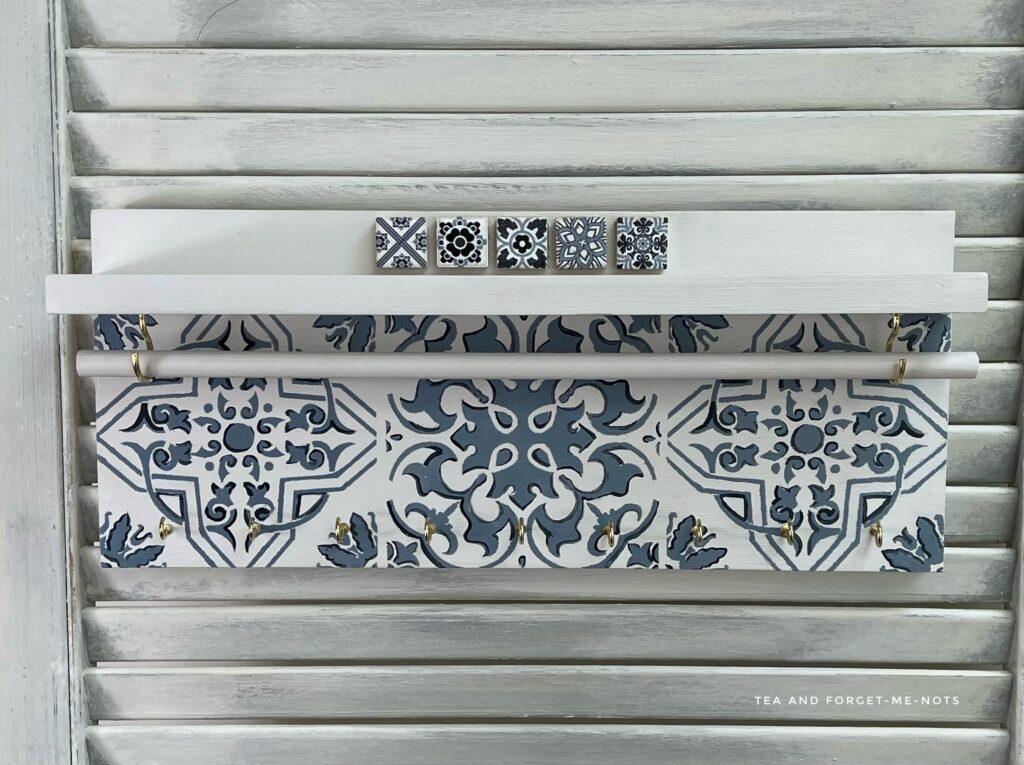
The combination of colours has come out well.
It’s a special place to hang some of your prized possessions. For a platinum ring rather than a platinum album, these days.
I’m especially pleased that I could save it from its fate of going to the dump.
Thanks for taking the time to read this makeover. If you enjoyed it, please consider subscribing to my newsletter.
If you’d like to watch the makeover in progress, check out the 6-minute YouTube video too.
And here’s another jewellery holder with a stencil design. This one started as a jewellery holder and got a fab makeover!
If you loved this project, you’ll love these projects too:
would you make this craft?
I love seeing what you do. Please mention @teaandforgetmenots and share your creations with me!
Be sure to check out all the ‘Do It Over Designers’ listed below to see their lovely do-overs too!
My Hubbard Home
Pin it for later – Repurpose a CD rack

Hi there! I'm Rachel Bowyer, a passionate DIY enthusiast with a knack for transforming the old into something beautifully new. With a deep love for furniture painting, refinishing, and the art of crafting. I've been documenting my DIY projects and restoration journey since 2018. I specialise in techniques like decoupage, stencilling, and decor transfers. Join me as we explore the world of creativity and home improvement, one project at a time.
That is super creative and I just love the colors!! Beautiful!
Thanks, Kim. Fortunately the colour palette was ready made for me!
That turned out so pretty and I love the tip about using the drill to screw in the cup hooks, brilliant!
Thanks, Tania. I love that tip too!
Great save Rachel! I especially love how you added depth with the darker paint. Did you hand brush those areas of the stencil or lay it back on and then paint again?
Thanks Sara, I hand-painted the dark blue. The imperfection of it gave it a bit of a boho feel.
You did a fabulous job in transforming a CD rack into a lovely jewelry holder, Rachel! Using a stencil and little mosaic tiles created such a unique design! I also checked out your wonderful video which was quite informative! I could follow exactly how you made your holder – which was really cool!
Thanks so much, Gail. It’s definitely achievable. I loved your makeover too, although I’m unable to comment on your page, unfortunately.
Wow! It’s gorgeous! I would’ve never thought to do this!
Thank you. Spare wood is a blank canvas!
Rachel, this is really unique. I love the combo of tiles and stencils.
Thank you very much, Rachelle.
Your repurposed project is so pretty! I love the stencil design and colors. You ended up saving that CD holder twice! Good idea holding on to those wood pieces.
Thank you! I’m definitely one who needs to wait for inspiration to hit.
It is so pretty, Rachel! I love the blue and white combination.
Thanks, Marieza.
Great save Rachel! You must have been so disappointed when the end piece broke but I love how you preserved and found a way to salvage the old CD rack anyway into this pretty mosaic jewelry holder.
I definitely gasped when it happened. Thankfully I hadn’t completed it.
What an amazing transformation!! Great project!
Thank you, Lynne.
I saw your video and loved this jewelry holder. It not only is practical, it’s beautiful and creative. You have so much talent!!!!
Aw, thank you for your kind words, Tammy.
Your really thought outside of the box on this one! I would have never thought to take it apart and make something new out of it. Pinned and thanks for sharing some inspiration.
It did take a fair few months to finally have the idea but it was worth it in the end.